Easter & Spring Crafts
[anvplayer video=”5095062″ station=”998128″]
Danielle Rode, the owner of Upsy Daisy in White Bear Lake shares some easy Easter crafts you can do on your own.

Sweet Daisy Market
Saturday, May 21
Supporting MN’s local artist community while offering a fun, interactive day for the visitors (live music, food, make-and-takes, free demos, etc.)
Artisans can apply to be a vendor at UPSY-DAISY.NET
Projects Danielle showed:
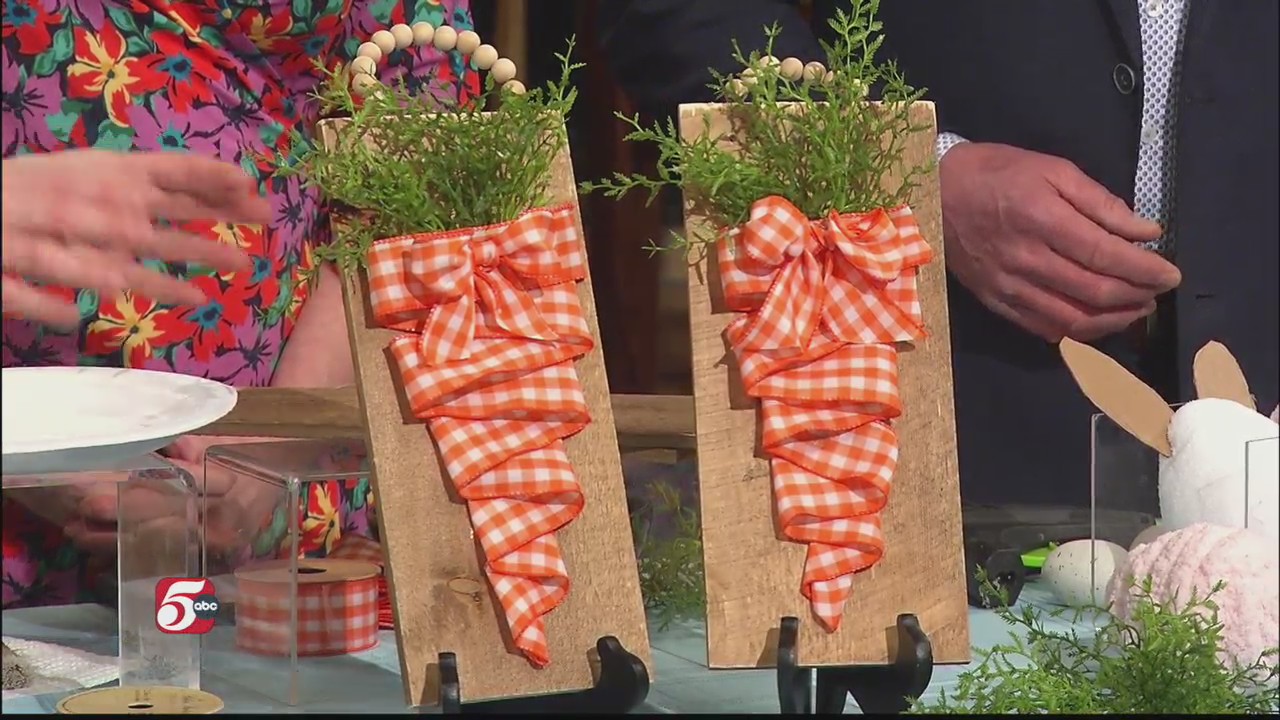
#1 / Carrot Wall Hangings
Materials:
- Scrap Wood/Board (Danielle’s were approx. 12”x5”
- Orange Gingham Ribbon
- Faux Greens
- Wire cutters
- Hot Glue Gun
- Floral Wire
- Wood Beads
- Drill
- Scissors
Instructions:
Hanger for the Art:
- Start by drilling 2 holes at the top of your wood board.
- Use the floral wire and wood beads to create a hanger for the board. (String the wood beads on the wire).
Create the Carrot:
- Start at the bottom of the board, where the carrot tip would be. Fold a the ribbon about a half inch under and hot glue to bottome/center of the board.
- Continue to add the ribbon with hot glue in a zig zag fashion to the wood. It’s easier (especially on your fingers) to add the glue directly to the wood, and tap the ribbon onto it. You want the ribbon to form a carrot shape, so glue the ribbon in winder lengths as you continue up the board.
Add the Greens:
- Use wire cutters if needed to cut a nice amount of greens for the top of your carrot. Stick the greenery under the ribbon until you are happy with how full it is. Secure with hot glue if needed.
- Top your carrot with a bow if desired.

#2 / Yarn Eggs/Bunnies
Materials:
- Styrofoam eggs
- Cardboard
- Scissors
- Knife
- Hot Glue Gun
- Chunky Yarn
Instructions:
- Cut cardboard, bunny ears
- Use a knife to make slits at the top of your Styrofoam egg to hold the carboard ears.
- Use hot glue to help secure the cardboard ears into the slits.
- Wrap the ears with the chunky yarn (starting at the tip). Use hot glue gun to secure the yarn as you go.
- Next, cover the remaining egg with the chunky yard. Start at the bottom of the egg and work your way to the top, using hot glue to secure as you go.

#3 / Spring Wall Basket
Materials:
- 3 – Wood Boards (24”x5”)
- 2 to 3 pieces of wood approx. ½” x 12”) (used to brace the larger boards)
- Wood glue
- White Paint (We used Country Chic Paint, “Crinoline”)
- Paint Brush
- Hanging willow/vine basket
- Faux greens/florals
- Hot glue gun/glue
Instructions:
- Secure the three boards together using the smaller pieces of wood and wood glue. Let dry.
- Paint the boards white. Let dry.
- Dry brush (white) over the willow basket to soften it’s look. Let dry.
- Fill the basket with greens/florals.
- Tie a bow around the basket.
- Secure the basket to the white boards with cup hooks.
- Hang your décor on your front door to welcome guests, or over your mantle to enjoy.